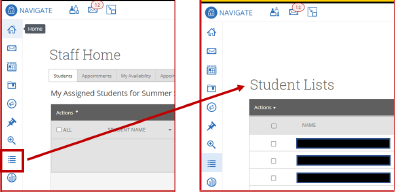
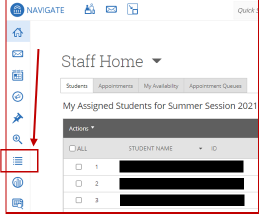
List and Searches Icon
An individual can access the "List & Searches" function from their Staff Home. The icon for the function is located on the left icon column. After clicking on the icon, an individual can access the lists and saved searches that the individual has created.
Creating a Student List
The student list feature allows users to create searchable lists of students in two ways.
- Using Advanced Search results
- Uploading an MS Excel (.CSV) file
The results for the student's list will not change unless the user makes manual edits.
Method 1: Using Advanced Search
This method will explain how to capture the results of an “Advanced Search” and turn them into Student lists.
- On the Staff Home Page, navigate to the Advanced Search Icon located on the left side of the
web page.
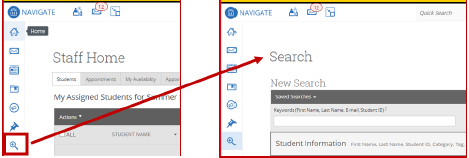
2. After running your search, you can either select the individual students you want to add to your list or select all students.

3. If your search returned more than 100 students, you will need to click the “Select all” option located below the dark grey “Actions” bar.
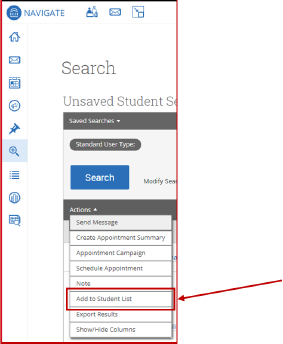
4. After you have selected the students to add to your Student List, click on the “Actions” drop-down menu button located in the dark gray bar.
5. Select “Add to Student List” from the options.
6. Select which list to add the students to or select “Create New List”.
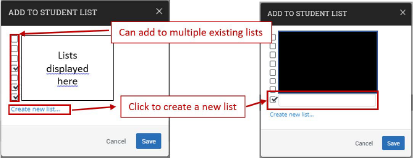
7. Click Save when done.
Method 2: Uploading an MS Excel (.CSV) file - Converting an Excel document into a CSV document
Before uploading the document, this section will cover the method used to change a standard Excel document (.xls,.xslx) into a .csv file format. It will also cover how to make sure the right .csv format is used. Navigator does not work with all .csv formats.
- Please note: Navigator will only use uploaded files with student ID. If your document does not contain this information, it will not upload.
- Open your Excel list file.
- Click the file option located in the top ribbon to open the options menu.
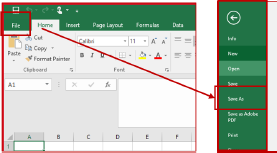
4. Select “Save As”.
5. Choose a location to save the new formatted document to.
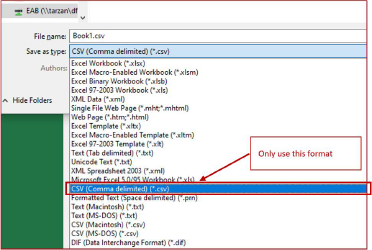
6. In the section for “Save as type:”, select CSV(Comma delimited) (*.csv)
Uploading a CSV document into Navigator
Once you have the document saved in the correct CSV file type [CSV (comma delimited)], you can upload it into Navigate to create a new Student List or append an existing one.
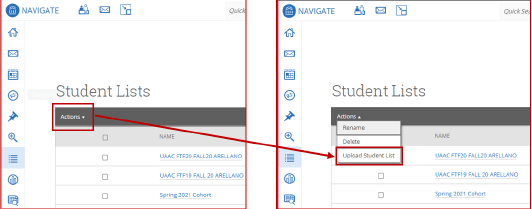
1. On the Staff Home Page, select the “List and Searches” icon
2. In the section for “Student Lists”, click the Actions” button drop down menu and select “Upload student list
3. In the Upload File to Student List, choose either an existing list to add to or the “New Student List” option to create a list.
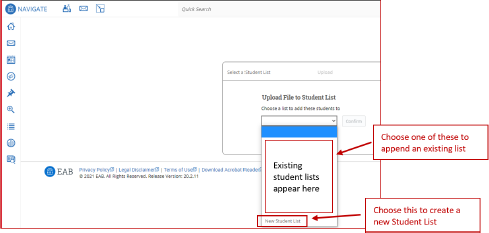
4. When creating a new list you will need to create a name for it.
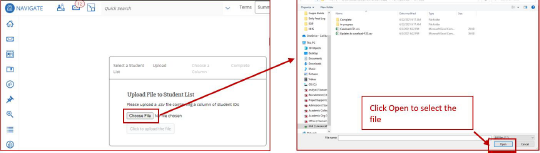
5. After selecting a name, you need to choose the file to upload. Your selections will appear as a pop-up window. Navigator to the directory where your formatted CSV is located and select the correct file. Click open to select the file. You can only upload 1 file at a time.
6. After clicking open you will be brought back to the Upload File to Student List screen. The “Click to upload file” button will now be blue and may be clicked to proceed to the next step.
7. When you select “Click to upload file” the button will turn into a drop down list showing the column headers of your CSV file. Choose the column header that contains the student ID numbers. Navigator only works with student ID numbers.
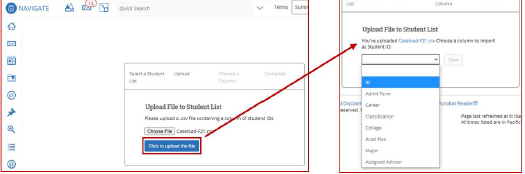
8. Click save when done. If all steps were followed, you will see a success message along with hyperlinks to take you to the new list or to the page showing all of your Student Lists.
For additional assistance, contact navigator@sfsu.edu.
Comments
0 comments
Please sign in to leave a comment.